Saturday, January 28, 2012

JSTL Practice: Basic and Flow Control Tags

In this post, we will practice several JSTL core tag:
out, set, remove, if, choose and forEach

Before practice

We use JSTL 1.2 here so have to find the jstl-1.2.jar and put it into WEB-INF/lib,
and the code fragment on the page

<%@ page isErrorPage="true" language="java"
    contentType="text/html; charset=UTF-8" pageEncoding="UTF-8"%>
<!-- This is the uri for JSTL 1.2 -->
<%@taglib prefix="c" uri="http://java.sun.com/jsp/jstl/core"%>
<!-- EL is required -->
<%@ page isELIgnored ="false" %>

This denotes use JSTL 1.2 core tag with prefix 'c:'

The out tag

The out tag is like the 'out.print',
it output the value that you assigned.

Assume we have the fragment below to put the attributes in request scope and session scope
( JSP object has four scope, from top to bottom: application, session, request and page)

// put the value "123" with name "UID" into request scope
((HttpServletRequest)request).setAttribute("UID", "123");
// put the value "ABC" with name "UID" into session scope
((HttpServletRequest)request).getSession().setAttribute("UID", "ABC");
// put the value "ZZZ" with name "Test" into session scope
((HttpServletRequest)request).getSession().setAttribute("Test", "ZZZ");

and the fragment below on JSP page

<!-- the UID is 123 from Request scope
    (the lowest scope contains the attribute) -->
<c:out value="${UID}" /><br />
<!-- the UID is ABC from Session scope -->
<c:out value="${sessionScope.UID}" /><br />
<!-- the Test is ZZZ from Session scope
    (the lowest scope contains the attribute) -->
<c:out value="${Test}" /><br />

The result will be

The EL '${UID}' will try to find the attribute 'UID', starts from the lowest scope (Page scope),
then Request scope and stop when find it.

If there are two or more value with the same attribute name in different scope (in this case, Session scope)
and we want to get the attribute in higher scope,
we have to use '${sessionScope.UID}'

The attributes not used here
escapeXml 
defalut value: true,
usage:
true denotes the output value will be encoded to prevent XSS (Cross-site scripting) attack.
false denotes just output what you assign.

default
default value: "" (empty string)
usage: Output this default value if can not find the value you assigned.

The set tag

The set tag is like the 'setAttribute', it put the attribute into Page scope as default,
or put the attribute into the scope you assigned.

For example, assume the fragment below on the page:

<!-- set a variable in page scope -->
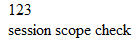
<c:set var="check" value="123" />
<!-- set a variable in session scope -->
<c:set var="check" value="session scope check" scope="session" />
<c:out value="${check}" /><br />
<c:out value="${sessionScope.check}" /><br />

the result will be:


The remove tag

The remove tag remove an attribute from the assigned scope,
if the scope is not assigned, it will remove the attribute from every scope.

For example, assume the fragment below on the page (cont)

<!-- remove the 'check' variable from session scope -->
<c:remove var="check" scope="session" />
<c:out value="${check}" /><br />
<c:out value="${sessionScope.check}" /><br />

The result will be

The if tag

The if tag test a condition, insert its body content into page if the condition is true.
It will store the test result if you specify the 'var' attribute in the default Page scope,
you can change the scope by specify the 'scope' attribute.

For example, assume the fragment below on the page (cont)

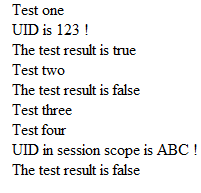
<!-- the UID in Request scope is 123 -->
Test one <br />
<c:if test="${UID eq check}" var="testResult" scope="request">
    UID is 123 !<br />
</c:if>
The test result is <c:out value="${testResult}" /><br />
<!-- change the check variable -->
<c:set var="check" value="ABC" />
<!-- the UID in Request scope is not ABC -->
Test two <br />
<c:if test="${UID eq check}" var="testResult" />
<!-- remove the testResult from request scope -->
<c:remove var="testResult" scope="request" />
The test result is <c:out value="${testResult}" /><br />
<!-- the UID in Session scope is not 123 -->
Test three <br />
<c:if test="${sessionScope.UID eq '123'}">
    UID in session scope is 123 !<br />
</c:if>
<!-- the UID in Session scope is ABC -->
Test four <br />
<c:if test="${sessionScope.UID eq check}" var="testResult" scope="request">
    UID in session scope is ABC !<br />
</c:if>
The test result is <c:out value="${testResult}" /><br />

The result will be:


The choose-when-otherwise tag set

The choose-when-otherwise tag set works as if-else if-else,
for example, assume the fragment below on the page (cont)

<c:choose>
    <c:when test="${sessionScope.UID eq '123'}">
        <span style="color: red;">
            UID in session scope is 123 !<br />
        </span>
    </c:when>
    <c:when test="${sessionScope.UID eq '456'}">
        <span style="color: green;">
            UID in session scope is 456 !<br />
        </span>
    </c:when>
     <c:otherwise>
         <span style="color: brown;">
             UID in session scope is <c:out value="${sessionScope.UID}" /><br />
        </span>
     </c:otherwise>
</c:choose>

The result will be:


The forEach tag

The forEach tag is used to loop through a collection,
for example, assume we have the fragment below to put a data object into request scope,
and there is a product list in the data object:

// create product list
List<Product> pdl = new ArrayList<Product>();
for (int i = 1; i <= 10; i++)
    pdl.add(new Product("ID_"+i, "NAME_"+i, i));
// create data object
Data dt = new Data(pdl);
// put data object into request scope
((HttpServletRequest)request).setAttribute("data", dt);

And the fragment below to create a table to show the product list

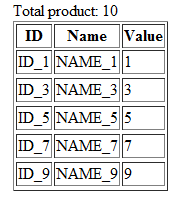
<!-- use forEach to convert a list to table -->
Total product: <c:out value="${data.productCount}" /> <br />
<table border="1">
    <tr>
        <th scope="col" align="center">
            ID
        </th>
        <th scope="col" align="center">
            Name
        </th>
        <th scope="col" align="center">
            Value
        </th>
    </tr>
    <c:forEach items="${data.productList }" var="product" begin="0" end="9" step="2">
        <tr>
            <td><c:out value="${product.id}" /></td>
            <td><c:out value="${product.name}" /></td>
            <td><c:out value="${product.value}" /></td>
        <tr>
    </c:forEach>
</table>

The result will be:


The attributes in this case:
items: the collection to loop through
var: denotes the current item
begin: the start position, in this case is 0 (first one)
end: the end position
step: position will increased by the value of each iteration

Note the expression '${data.productList}' denotes *.getAttribute("data").getProductList,
i.e., there should a function called getProductList in data object,
but the 'productList' member is not required.
The getter is the only thing it depends on.

Use forEach tag to do a loop

forEach tag can be used to do a loop without a collection,
for example, assume the fragment below on page:

<!-- use forEach to loop and sum 1 to 10 -->
<c:set var="sum" value="${0}" />
<c:forEach begin="1" end="10" step="1" varStatus="status">
    <c:set var="sum" value="${sum+status.count}" />
</c:forEach>
<c:out value="${sum}" />

The result will be:

the varStatus is the status of iteration.

Download:
The full project is at github
https://github.com/benbai123/JSP_Servlet_Practice/tree/master/Practice/JSTLPractice

The files in this post are
/src/test/jstl/Data.java
/src/test/jstl/Product.java
/src/test/jstl/filters/PracticeOne.java
/WebContent/practice_one.jsp

References:
http://docs.oracle.com/javaee/5/tutorial/doc
http://geekexplains.blogspot.com/2008/06/whats-scope-of-jsp-objects-how-many.html

Friday, January 27, 2012

JSTL Introduction

From official document:

The JavaServer Pages Standard Tag Library (JSTL) encapsulates as simple tags the core functionality common to many Web applications. JSTL has support for common, structural tasks such as iteration and conditionals, tags for manipulating XML documents, internationalization tags, and SQL tags. It also provides a framework for integrating existing custom tags with JSTL tags.

In short, it helps us replace scriptlet with JSTL tag, make the page cleaner and simpler, reduce the complexity of JSP page and make it easy to read/understand/maintain.

Reference:

http://www.oracle.com/technetwork/java/index-jsp-135995.html

MySQL character-set problem: Convert an entire MySQL database character-set and collation to UTF-8?

I got the error below after add/remove some column in a table and do 'join'

Illegal mix of collations (utf8_general_ci,IMPLICIT) and (utf8_unicode_ci,IMPLICIT) for operation '='

I solve this by change char set of table as follows:

ALTER TABLE `db_name`.`tbl_name` CONVERT TO CHARACTER SET utf8 COLLATE utf8_general_ci;

the better way is change db char set then change table's as follows:

ALTER DATABASE databasename CHARACTER SET utf8 COLLATE utf8_general_ci;
ALTER TABLE tablename CHARACTER SET utf8 COLLATE utf8_general_ci;

References:

http://stackoverflow.com/questions/6115612/how-to-convert-an-entire-mysql-database-characterset-and-collation-to-utf-8

Thursday, January 26, 2012

Encode and format my code for blog post

This is the code formatter for my preferred style,

effect:
encode special char '<', '>', '"' and '&'
change 'tab' to space x 4
color comment line/block (starts with '//' or '/*') to dark green
color doc block (starts with '/**' or '<!--') to dark blue
no break line, has horizontal scroll bar

** tested at blogger and chrome only :)


Download: The source is at github https://github.com/benbai123/HTML_CSS_Javascript_practice/blob/master/simple_code_formatter.html

JSP Practice: Simple chat

This post is about a simple JSP chat page, it's really simple, contains only:
2 jsp pages,
3 servlet,
1 css file
1 js file

and it use servlet3 annotation to do config so no web.xml

described as follows:

index.jsp

<%@ page isErrorPage="true" language="java"
    contentType="text/html; charset=UTF-8" pageEncoding="UTF-8"%>
<%@ page isELIgnored ="false" %>
<html>
    <head>
        <meta http-equiv="Content-Type" 
            content="text/html; charset=UTF-8"/>
        <title>Login page</title>
    </head>
    <body>
        <form action="login.go" method="post">
            <span>Type a name then press login to enter chat room</span>
            <input id="userId" type="text" value="Your ID" name="uid" />
            <input type="submit" value="login"/>
        </form>
    </body>
</html>

only a form, post to login.go with the user id

Login.java

package test.jsp.simplechat;

import java.io.IOException;
import java.util.*;

import javax.servlet.ServletException;
import javax.servlet.annotation.WebServlet;
import javax.servlet.http.HttpServlet;
import javax.servlet.http.HttpServletRequest;
import javax.servlet.http.HttpServletResponse;

@WebServlet(name="LoginServlet", urlPatterns={"/login.go"},
        loadOnStartup=1)
public class Login extends HttpServlet {
    @Override
    protected void doPost(HttpServletRequest req, HttpServletResponse resp)
        throws ServletException, IOException {
        String uid = new String(req.getParameter("uid").getBytes("ISO-8859-1"), "UTF-8");
        String newUid = uid;
        int i = 2;
        Map chat = Chat.getChatMap();
        synchronized (chat) {
            // prevent uid conflict
            if ("you".equalsIgnoreCase(newUid))
                newUid = uid + i++;
            while (chat.containsKey(newUid))
                newUid = uid + i++;
            uid = newUid;
            chat.put(uid, new ArrayList());
        }
        req.getSession().setAttribute("UID", uid);
        resp.sendRedirect("chat.jsp");
    }
}

the login servlet, check the user id here, if the user id is 'you' then append a number to it, because 'you' is a key word for display self message. Also append number to solve any id conflict.

Note the

String uid = new String(req.getParameter("uid").getBytes("ISO-8859-1"), "UTF-8");

is required or the utf-8 char will not stored to map correctly.

Finally store uid in session then redirect to chat.jsp

chat.jsp

<%@ page isErrorPage="true" language="java"
    contentType="text/html; charset=UTF-8" pageEncoding="UTF-8"%>
<%@taglib prefix="c" uri="http://java.sun.com/jsp/jstl/core"%>
<%@ page isELIgnored ="false" %>
<!-- Redirect to index.jsp if no UID -->
<c:if test="${UID == null}">
    <c:redirect url="index.jsp" />
</c:if>
<html>
    <head>
        <meta http-equiv="Content-Type" 
            content="text/html; charset=UTF-8"/>
        <title>Login page</title>
        <link href="css/chat.css" rel="stylesheet" type="text/css">
        <script type="text/javascript" src="js/chat.js"></script>
    </head>
    <body>
        <form action="logout.go" method="post">
            <div>This is chat page</div>
            <div>Type message then press ENTER key to send message</div>
            <div>Click logout to return the login page</div>
            <div>Your name: <span id="uid">${UID}</span></div>
            <div id="content" class="content"></div>
            <div>
                <!-- listen to keyup to send message if enter pressed -->
                <textarea class="msg-input" onkeyup="chat.dokeyup(event);">input text here</textarea>
            </div>
            <input type="submit" value="logout" />
        </form>
    </body>
</html>

First check UID and redirect to 'login.jsp' if UID is not in session.
link to style and js file, there is a timer will start while load js file.
listen to keyup event of input area to send content if enter pressed,
logout if logout button clicked.

chat.js

// init
window.chat = {};

// post to send message to chat.do
chat.sendMsg = function (msg) {
    var request;

    msg = msg.replace(/&/g, '&amp;') // encode to prevent XSS
                .replace(/</g, '&lt;')
                .replace(/>/g, '&gt;')
                .replace(/"/g, '&quot;')
                .replace(/\n/g, '<br />'); // replace textarea newline to line break tag
    alert(msg);
    if (request = this.getXmlHttpRequest()) {
        request.open('POST', 'chat.do?action=send&msg='+msg+'&time='+new Date().getTime());
        request.send(null);
        chat.updateContent('<div>You said: '+msg+'</div>');
    }
};

// post 'get' action to chat.do to require new message if any
chat.startListen = function () {
    if (!chat.listen)
        chat.listen = setInterval (function () {
            var request;
            if (request = chat.getXmlHttpRequest()) {
                request.open('POST', 'chat.do?action=get&time='+new Date().getTime());
                request.send(null);
                request.onreadystatechange = function() {
                    if(request.readyState === 4) {
                        if(request.status === 200) {
                            var json = request.responseText;
                            // has new message
                            if (json && json.length) {
                                // parse to array
                                var obj = eval('(' + json + ')');
                                var msg = '';
                                for (var i = 0; i < obj.length; i++) {
                                    msg += '<div>'+obj[i]+'</div>';
                                }
                                chat.updateContent(msg);
                            }
                        } else if(request.status === 400 || request.status === 500)
                            document.location.href = 'index.jsp';
                    }
                };
            }
        }, 3000);
};

chat.updateContent = function (msg) {
    var content = document.getElementById('content'),
        atBottom = (content.scrollTop + content.offsetHeight) >= content.scrollHeight;
    content.innerHTML += msg;
    // only scroll to bottom if it is at bottom before msg added
    if (atBottom)
        content.scrollTop = content.scrollHeight;
};
chat.dokeyup = function (event) {
    if (!event) // IE will not pass event
        event = window.event;
    if (event.keyCode == 13 && !event.shiftKey) { // ENTER pressed
        var target = (event.currentTarget) ? event.currentTarget : event.srcElement,
            value = target.value;
        // make sure not only space char
        if (value && value.replace(/^\s\s*/, '').replace(/\s\s*$/, '').length > 0) {
            this.sendMsg(target.value);
            target.value = '';
        }
    }
};
// get the XmlHttpRequest object
chat.getXmlHttpRequest = function () {
    if (window.XMLHttpRequest
        && (window.location.protocol !== 'file:' 
        || !window.ActiveXObject))
        return new XMLHttpRequest();
    try {
        return new ActiveXObject('Microsoft.XMLHTTP');
    } catch(e) {
        throw new Error('XMLHttpRequest not supported');
    }
};
onload = function () {
    chat.startListen();
};

This file do two things,

It starts a timer after page loaded by chat.startListen();, it will periodically send an ajax request to server to get the latest message if any then put them into content div and scroll content to bottom as need.

The keyup event of input area will trigger the chat.dokeyup, then call chat.sendMsg if enter pressed and input area is not empty.

Chat.java

package test.jsp.simplechat;

import java.io.IOException;
import java.io.PrintWriter;
import java.util.*;

import javax.servlet.ServletException;
import javax.servlet.annotation.WebServlet;
import javax.servlet.http.HttpServlet;
import javax.servlet.http.HttpServletRequest;
import javax.servlet.http.HttpServletResponse;

import net.sf.json.JSONArray;

@WebServlet(name="ChatServlet", urlPatterns={"/chat.do"},
  loadOnStartup=1)
public class Chat extends HttpServlet {
 /**
  * 
  */
 private static final long serialVersionUID = 113880057049845876L;
 // message map, mapping user UID with a message list
 private static Map<String, List<String>> _chat = new HashMap<String, List<String>>();
 @Override
 protected void doPost(HttpServletRequest req, HttpServletResponse resp)
  throws ServletException, IOException {
  req.setCharacterEncoding("UTF-8");
  String action = req.getParameter("action");
  // send message
  if ("send".equals(action)) {
   // get param with UTF-8 enconding
   String msg = new String(req.getParameter("msg").getBytes("ISO-8859-1"), "UTF-8");
   String uid = (String)req.getSession().getAttribute("UID");
   for (String s : _chat.keySet()) {
    if (!s.equals(uid)) {
     synchronized (_chat.get(s)) {
      // put message to any other user's msg list
      _chat.get(s).add(uid+" said: "+msg);
     }
    }
   }
  } else if ("get".equals(action)) { // get message
   String uid = (String)req.getSession().getAttribute("UID");
   if (uid == null)
    resp.sendError(HttpServletResponse.SC_BAD_REQUEST);
   List<String> l = _chat.get(uid);
   synchronized (l) {
    if (l.size() > 0) {
     // for UTF-8 chars
     resp.setCharacterEncoding("UTF-8");
     PrintWriter out = resp.getWriter();
     JSONArray jsna = new JSONArray();
     // add all msg to json array and clear list
     while (l.size() > 0)
      jsna.add(l.remove(0));

     out.println(jsna);
     out.close();
    }
   }
  }
 }
 public static Map<String, List<String>> getChatMap () {
  return _chat;
 }
}

This class hold a map which mapping the user id with a message list,
when a user request send the message, it put the message to all other user's message list.
when a user request get message, it put all message from that user's message list into a json array and write it to response writer.

chat.css

.content {
 width: 600px;
 height: 400px;
 overflow: auto; 
 border: 1px solid #991111;
}
.msg-input {
 width: 600px;
 border: 1px solid #119911;
}

simply style the content and message input area.

Logout.java

package test.jsp.simplechat;

import java.io.IOException;

import javax.servlet.ServletException;
import javax.servlet.annotation.WebServlet;
import javax.servlet.http.HttpServlet;
import javax.servlet.http.HttpServletRequest;
import javax.servlet.http.HttpServletResponse;

@WebServlet(name="Logout", urlPatterns={"/logout.go"},
        loadOnStartup=1)
// practice: invalidate session
public class Logout extends HttpServlet {
    /**
     * 
     */
    private static final long serialVersionUID = -6175876557872938832L;

    @Override
    protected void doPost(HttpServletRequest req, HttpServletResponse resp)
        throws ServletException, IOException {
        req.getSession().invalidate();
        resp.sendRedirect("index.jsp");
    }
}

Simply invalidate the session and redirect to index.jsp

Download:
Download full project from github:
https://github.com/benbai123/JSP_Servlet_Practice/tree/master/Practice/JSPChat

Dependency:
The required jar files:
commons-beanutils-1.8.3.jar
commons-collections-3.2.1.jar
commons-lang-2.5.jar
commons-logging-1.1.1.jar
ezmorph-1.0.6.jar
json-lib-2.4-jdk15.jar                     // these six are for json
jstl-1.2.jar                                      // this one is for JSTL

Wednesday, January 25, 2012

Basic Servlet Practice

A project of really basic practice, not good practice, just practice.

You can download the basic practice project from github
https://github.com/benbai123/JSP_Servlet_Practice/tree/master/Practice/BasicServletPractice

Description:

index.html

This page practice two things:
Use AJAX to get the hint of id and password,
it send the http get request to context 'auth.hint',

Use form submit to do login,
the submit form action is the http post to context 'login.go',

error.jsp

This is the error page defined in 'web.xml',
it simply display the exception message

the exception is from login servlet

content.html

This page practice JSON,
it use AJAX to get the content from ContentServlet,
and use eval method to transfer the content to array,
the array combined by a string and two inner array,
the first string is a javascript command which executed by eval method,
the two inner array are the content and displayed by that command.

If it receive the bad request status,
it will redirect to login page

Hint.java

This file practice set/get attribute from session,
output the text to client and config servlet by annotation.

It provide the hint of id and password,
or show alert message if ask too much times.

Login.java

This file practice get parameter from request,
redirect to another page.
It config in web.xml

It get the input id and password,
if it is correct, redirect to content page,
throw ServletException with message 'Login fail' otherwise

Content.java

This file practice JSON,
it also config by annotation.

It create two small JSON array,
then put a command that will execute at client and
the two small array into a big one.

** To use JSON, the jars below are required
json-lib-2.4-jdk15.jar, ezmorph-1.0.6.jar, commons-logging-1.1.1.jar,
commons-lang-2.5.jar, commons-collections-3.2.1.jar, commons-beanutils-1.8.3.jar

Ref: http://json-lib.sourceforge.net/

Logout.java

This file invalidate the session then redirect to login page.

ReqFilter.java

This file practice the filter, and config filter by annotation

This is a filter protect the content page,
it triggered by the 'content.gen' context
(the content page send request to it to get content)

if a session do not contain the 'Login' data,
the request can not pass this filter and will get the 'bad request' status.

Sunday, January 22, 2012

Integrate Tomcat with Apache HTTP Server: Forward JSP/Servlet Content to Tomcat

Usually we want serve static content or php by Apache, only serve JSP/Servlet content by Tomcat.
We can do this by several steps, described as follows:

Steps:

Step 1.
Get Apache HTTP Server:
go to http://httpd.apache.org/,
click from a mirror then download (I choose 2.2.21) and install


The document root of Apache HTTP Server is
APACHE_HOME/htdocs
(APACHE_HOME = [Install path]/Apache2.2)
You can change it by modify  APACHE_HOME /conf/httpd.conf

Create an icon named favicon.ico,
put it into APACHE_HOME/htdocs
You may need the png2ico to help this


Step 2.
Get Tomcat:
go to http://tomcat.apache.org/
click Tomcat 7.0 then download and install
(I just extract it)
then set TOMCAT_HOME Environment Variable

Step 3.
Copy htdocs/index.html and rename it to index.jsp,
put it at APACHE_HOME/htdocs/JEE/Test
(or put Test under TOMCAT_HOME/webapps if you skip Step 4.4)

currently it will show all html if you visit http://localhost/Test/index.jsp

Step 4.
Connect Apache HTTP Server and tomcat as follows:

Step 4.1.
Get mod_jk from http://www.apache.org/dist/tomcat/tomcat-connectors/jk/binaries/windows/
I choose tomcat-connectors-1.2.32-windows-i386-httpd-2.2.x.zip
Extract it and find mod_jk.so in it
Put mod_jk.so into  APACHE_HOME /modules

Step 4.2.
Create workers.properties,
Put it into APACHE_HOME /conf
Edit it as below

# Define worker 'worker1'
worker.list=worker1

# Set properties for worker 'worker1' (ajp13)
worker.worker1.type=ajp13
worker.worker1.host=localhost
worker.worker1.port=8009

worker.worker1.cachesize=10
worker.worker1.cache_timeout=600
worker.worker1.socket_keepalive=1
worker.worker1.recycle_timeout=300

For more information of workers.properties, please refer to
http://tomcat.apache.org/connectors-doc/reference/workers.html

Step 4.3.
Create folder C:/var/log/httpd
Edit APACHE_HOME /conf/http.conf, append

# Load mod_jk module
LoadModule    jk_module  modules/mod_jk.so
# Where to find workers.properties
JkWorkersFile conf/workers.properties
# Where to put jk shared memory
JkShmFile     /var/log/httpd/mod_jk.shm
# Where to put jk logs
JkLogFile     /var/log/httpd/mod_jk.log
# Set the jk log level [debug/error/info]
JkLogLevel    info
# Select the timestamp log format
JkLogStampFormat "[%a %b %d %H:%M:%S %Y] "
# Send servlet for context /Test to worker named worker1
JkMount  /Test/* worker1

This line JkMount /Test/* worker1 denotes forward the context path match /Test/* to Tomcat,
you can add multiple JkMount to define multiple path

Step 4.4.
This step should be skipped if you put Test under TOMCAT_HOME/webapps at Step 3
Edit TOMCAT_HOME/conf/server.xml

Change

<Host name="localhost"  appBase="webapps"
            unpackWARs="true" autoDeploy="true">

to

<Host name="localhost"  appBase="APACHE_HOME\htdocs\JEE"
            unpackWARs="true" autoDeploy="true">

The Apache HTTP Server is connected to Tomcat now,
the only thing left to do is restart Apache HTTP Server and start Tomcat

Step 5.
Restart Apache HTTP Server:

Click the icon at System Tray


then click Apache2.2 -> Restart

Step 6.
Start Tomcat as a service,

At this point, make sure you have set the environment variables correctly,
for example:


Open cmd.exe as Administrator (Right click on cmd.exe -> Run as Administrator)
cd to TOMCAT_HOME/bin
Execute

service.bat install

NET START Tomcat7


Now you can visit http://localhost/Test/index.jsp and see your JSP page displayed correctly.

Download:
The resources can be downloaded from github
https://github.com/benbai123/JSP_Servlet_Practice/tree/master/Environment

References:
http://tomcat.apache.org/connectors-doc/webserver_howto/apache.html
http://tomcat.apache.org/connectors-doc/reference/workers.html
http://tomcat.apache.org/tomcat-4.1-doc/config/host.html
http://www.devside.net/guides/windows/tomcat

Friday, January 20, 2012

ZK Flow Control - Prevent Opening Multiple Tabs

Sometimes we want limit that one user can only active one page, how to achieve this?
There are several parts described as follows:

1. The entry page

test.zul

<zk>
    <button label="go to page 1">
        <attribute name="onClick">
            // get the user active time
            Long time = test.Maps.keyMap.get("userName");
            // If no active time or expired, set active time and redirect,
            // Stay at this page otherwise.
            if (time == null || (System.currentTimeMillis()-time) > 10000) {
                test.Maps.keyMap.put("userName", System.currentTimeMillis());
                test.Maps.tmpKeyMap.put("userName", test.Maps.keyMap.get("userName"));
                Executions.getCurrent().sendRedirect("page1.zul");
            }
            else // redirect to another error page as need here
                Executions.getCurrent().sendRedirect("");
        </attribute>
    </button>
</zk>

The entry page is the only page that a user can open multiple times, we check whether the user is already work at other page while 'go to page 1' button clicked, redirect to 'page1.zul' or stay at this page as need.

Note we put the active time into another tmpKeyMap before redirect to page1, we will check it at page1 later, we can not check the keyMap directly because the result will the same at different page/session.

2. Page 1

page1.zul

<zk>
    <div visible="false">
        <attribute name="onCreate">
            // get active time from tmpKeyMap and check it
            Long time = test.Maps.tmpKeyMap.get("userName");
            if (time == null || (System.currentTimeMillis()-time) > 10000)
                Executions.getCurrent().sendRedirect("test.zul");
            else
                self.setVisible(true);
        </attribute>
        page1<div></div>
        <button label="go to page 2">
            <attribute name="onClick">
                test.Maps.tmpKeyMap.put("userName", test.Maps.keyMap.get("userName"));
                Executions.getCurrent().sendRedirect("page2.zul");
            </attribute>
        </button>
    </div>
    <timer repeats="true" running="true" delay="1000">
        <attribute name="onTimer">
            // keep update the active time and clear the data in tmpKeyMap
            test.Maps.keyMap.put("userName", System.currentTimeMillis());
            if (test.Maps.tmpKeyMap.get("userName") != null)
                test.Maps.tmpKeyMap.remove("userName");
        </attribute>
    </timer>
</zk>

In this page, the content is initial invisible, we get the active time from tmpKeyMap and show the content if it is valid, redirect to test.zul otherwise.

Then we start a timer, keep update the active time, the delay is 1000ms and remember we consider that time as expired if (current time - active time) > 10000ms (10 seconds). You can adjust the delay time and expire condition as need, the larger the delay and expire condition, the longer the user have to wait to enter the page again after he/she left.

Conclusions:
The effect:

1. The user can not link to page1.zul directly
2. Only one page can redirect to page1.zul from test.zul
3. Click the browser's 'previous page' or refresh page will return to test.zul.
4. Can enter page1 again after return to test.zul and wait about 10 seconds.

Download
You can download the full project from github:
https://github.com/benbai123/ZK_Practice/tree/master/Flow/LimitOnePage

Saturday, January 14, 2012

ZK Custom Component - Window dragging every where

... drag an embedded window the dragging window image jumps so that it is positioned where the mouse position is at top left. ... Can I override this default drag shape behaviour?

Yes we can, we can override it by override the ghost function and getDrop function in Class zk.DnD, described as follows:

zk.afterLoad("zk", function () {
    // store the old ghost and getDrop function
    var oldGhost = zk.DnD.ghost;
    var oldGetDrop = zk.DnD.getDrop;
    zk.DnD.ghost = function (drag, ofs, msg) {
        if (jq(drag.node).hasClass('z-window-embedded')) {
            // the dgelm is the drag node follows the mouse cursor,
            var dgelm = document.createElement("div");
            dgelm.id = "zk_ddghost";
    
            zk.copy(dgelm.style, {
                position: "absolute", left: ofs[0] + "px",
                top: ofs[1] + "px"
            });
            
            dgelm.appendChild(getVisualGhost (drag, ofs));
            jq(dgelm).addClass("z-drag-ghost");
            document.body.appendChild(dgelm);
            return dgelm;
        } else // call old ghost if not embedded window
            return oldGhost.apply(this, arguments);
    };
    // called while end drag
    zk.DnD.getDrop = function (drag, pt, evt) {
        if (jq(drag.node).hasClass('z-window-embedded')) {
            restoreWindow(drag, pt);
        } else // call old getDrop if not embedded window
            return oldGetDrop.apply(this, arguments);
    };
});

The fragment above denotes 'do the special for embedded window, do original otherwise'.

The ghost function is called when drag start, it will return a HTML Dom node and make it follow the mouse cursor, our goal is create a dom node, let the cloned window follow that node with calculated offset and hide the original window.

The getDrop function is called when drag finish (release the mouse button), it get the target that the mouse cursor on it, our goal is display the original window with new position.


// get the visual ghost node
function getVisualGhost (drag, ofs) {
    // span is a child with position=relative in drag node,
    // node is a clone of dragged widget,
    // with position=absolute in span
    var span = document.createElement("span"),
        wgt = drag.node,
        node = jq(wgt).clone()[0],
        nstyle = node.style;

    // need a relative positioned span
    // to absolute position the cloned window
    span.style.position = 'relative';
    nstyle.position = 'absolute';
    nstyle.left = wgt.offsetLeft - ofs[0] + 'px';
    nstyle.top = wgt.offsetTop - ofs[1] + 'px';

    // save the diffX and diffY for end drag
    // for update the position in restoreWindow
    wgt.diffX = wgt.offsetLeft - ofs[0]+7;
    wgt.diffY = wgt.offsetTop - ofs[1]+5;

    // hide the original window
    wgt.style.display = 'none';
    span.appendChild(node);

    return span;
}

This fragment clone the window and make it follow the drag node, the span with relative position is required for absolute position the cloned window, then we calculate the left and top of the cloned window, and store it with a little bias '+7, +5' because the position of drag node will be changed later.


// update the position of original window,
// and show it
function restoreWindow(drag, pt) {
    var wgt = drag.control,
        n = wgt.$n(),
        wstyle = n.style,
        diffX = n.diffX,
        diffY = n.diffY;
    if ((typeof diffX) == 'number' && (typeof diffY) == 'number') {
        wstyle.left = pt[0] + diffX + 'px';
        wstyle.top = pt[1] + diffY + 'px';
        wstyle.display = 'block';
        n.diffX = n.diffY = null;
        drag.control._fireOnMove();
    }
}


This fragment display the original window with new position, and fire the move event to notice the server position is changed.


The full zul file is as below:

<zk>
    <script type="text/javascript"><![CDATA[
        zk.afterLoad("zk", function () {
            // store the old ghost and getDrop function
            var oldGhost = zk.DnD.ghost;
            var oldGetDrop = zk.DnD.getDrop;
            zk.DnD.ghost = function (drag, ofs, msg) {
                if (jq(drag.node).hasClass('z-window-embedded')) {
                    // the dgelm is the drag node follows the mouse cursor,
                    var dgelm = document.createElement("div");
                    dgelm.id = "zk_ddghost";
            
                    zk.copy(dgelm.style, {
                        position: "absolute", left: ofs[0] + "px",
                        top: ofs[1] + "px"
                    });
                    
                    dgelm.appendChild(getVisualGhost (drag, ofs));
                    jq(dgelm).addClass("z-drag-ghost");
                    document.body.appendChild(dgelm);
                    return dgelm;
                } else // call old ghost if not embedded window
                    return oldGhost.apply(this, arguments);
            };
            // called while end drag
            zk.DnD.getDrop = function (drag, pt, evt) {
                if (jq(drag.node).hasClass('z-window-embedded')) {
                    restoreWindow(drag, pt);
                }
                // call old getDrop if not embedded window
                return oldGetDrop.apply(this, arguments);
            };
        });
        // get the visual ghost node
        function getVisualGhost (drag, ofs) {
            // span is a child with position=relative in drag node,
            // node is a clone of dragged widget,
            // with position=absolute in span
            var span = document.createElement("span"),
                wgt = drag.node,
                node = jq(wgt).clone()[0],
                nstyle = node.style;

            // need a relative positioned span
            // to absolute position the cloned window
            span.style.position = 'relative';
            nstyle.position = 'absolute';
            nstyle.left = wgt.offsetLeft - ofs[0] + 'px';
            nstyle.top = wgt.offsetTop - ofs[1] + 'px';

            // save the diffX and diffY for end drag
            // for update the position in restoreWindow
            wgt.diffX = wgt.offsetLeft - ofs[0]+7;
            wgt.diffY = wgt.offsetTop - ofs[1]+5;

            // hide the original window
            wgt.style.display = 'none';
            span.appendChild(node);

            return span;
        }
        // update the position of original window,
        // and show it
        function restoreWindow(drag, pt) {
            var wgt = drag.control,
                n = wgt.$n(),
                wstyle = n.style,
                diffX = n.diffX,
                diffY = n.diffY;
            if ((typeof diffX) == 'number' && (typeof diffY) == 'number') {
                wstyle.left = pt[0] + diffX + 'px';
                wstyle.top = pt[1] + diffY + 'px';
                wstyle.display = 'block';
                n.diffX = n.diffY = null;
                drag.control._fireOnMove();
            }
        }
    ]]></script>
    <vbox>
        <hbox>
            <div height="350px" width="350px" style="background-color: red;">
                <button label="test" draggable="true" ></button>
            </div>
            <div height="350px" width="350px" style="background-color: green;">
                <label id="posX" value="position left: " style="font-size: 20px;" />
                <div></div>
                <label id="posY" value="position top: " style="font-size: 20px;" />
            </div>
        </hbox>
        <hbox>
            <div height="350px" width="350px" style="background-color: brown;"></div>
            <div height="350px" width="350px" style="background-color: blue;"></div>
        </hbox>
    </vbox>
    <window width="300px" height="300px" border="normal"
        title="test" draggable="true"
        style="position: absolute; left: 100px; top: 100px;">
        <attribute name="onMove">
            posX.setValue("position left: " + event.getLeft());
            posY.setValue("position top: " + event.getTop());
        </attribute>
    </window>
</zk>

Download:
drag_embedded_window_everywhere.zul
https://github.com/benbai123/ZK_Practice/tree/master/Components/projects/Components_Practice/WebContent

before_customized__not_desirable_dragging_positioning.swf
after_customized__drag_everywhere.swf
https://github.com/benbai123/ZK_Practice/tree/master/Components/demos/drag_embedded_window_everywhere

ZK Custom Component - Listbox Auto-scroll while Dragging

A listbox with draggable items currently will not auto scroll while dragging item above/below listbox it self, in this post, we will talk about how to implement the auto-scroll feature.

We override the zk.Draggable#_updateDrag method to implement it,

var oldUpdateDrag = zk.Draggable.prototype._updateDrag;
zk.afterLoad("zk", function () {
    zk.Draggable.prototype._updateDrag = function (pt, evt) {
        // call original _updateDrag method
        oldUpdateDrag.apply(this, arguments);

        var control = this.control, // original listitem
            node = this.node; // cloned listitem, the drag node
        if (control.$instanceof(zul.sel.Listitem)) {
            // get original listbox
            var listbox = control.getListbox(),
                dir;
            // start scroll if has a direction,
            // or clear the scroll timer 
            if (dir = shouldScroll(jq(node), jq(listbox)))
                startScroll(dir, listbox);
            else
                clearScroll(listbox);
        }
    }
});

This is the major part, we call the original _updateDrag method at first, then do scroll as need.


// return the scroll direction if have to scroll,
// return null otherwise.
function shouldScroll ($node, $listbox) {
    var top = $listbox.offset().top,
        itemTop = $node.offset().top;
    if (itemTop < top)
        return 'up';
    else {
        var bottom = top + $listbox.height(),
            itemBottom = itemTop + $node.height();
        return itemBottom > bottom? 'down' : null;
    }
}

This method check the position of drag node,
return:
'up' if the drag node is higher then listbox,
'down' if the drag node is lower then listbox,
null otherwise.


// create scroll timer with the specified direction
function startScroll (dir, listbox) {
    if (!listbox._scrollStarted)
        listbox._scrollStarted = setInterval(function () {
            var body = listbox.$n('body'),
                oldValue = body.scrollTop;
            body.scrollTop += dir == 'down'? 20 : (-20);
            // can not scroll any more
            if (body.scrollTop == oldValue)
                clearScroll(listbox);
        }, 50);
}

This method start a scroll timer based on the direction,
the scroll timer will clear it self if can not scroll any more.


// clear scroll timer
function clearScroll(listbox) {
    if (listbox._scrollStarted) {
        clearInterval(listbox._scrollStarted);
        listbox._scrollStarted = null;
    }
}

This method clear the scroll timer.

The full zul is as below

<zk>
    <script type="text/javascript"><![CDATA[
        var oldUpdateDrag = zk.Draggable.prototype._updateDrag;
        zk.afterLoad("zk", function () {
            zk.Draggable.prototype._updateDrag = function (pt, evt) {
                // call original _updateDrag method
                oldUpdateDrag.apply(this, arguments);

                var control = this.control, // original listitem
                    node = this.node; // cloned listitem, the drag node
                if (control.$instanceof(zul.sel.Listitem)) {
                    // get original listbox
                    var listbox = control.getListbox(),
                        dir;
                    // start scroll if has a direction,
                    // or clear the scroll timer 
                    if (dir = shouldScroll(jq(node), jq(listbox)))
                        startScroll(dir, listbox);
                    else
                        clearScroll(listbox);
                }
            }
        });
        // return the scroll direction if have to scroll,
        // return null otherwise.
        function shouldScroll ($node, $listbox) {
            var top = $listbox.offset().top,
                itemTop = $node.offset().top;
            if (itemTop < top)
                return 'up';
            else {
                var bottom = top + $listbox.height(),
                    itemBottom = itemTop + $node.height();
                return itemBottom > bottom? 'down' : null;
            }
        }
        // create scroll timer with the specified direction
        function startScroll (dir, listbox) {
            if (!listbox._scrollStarted)
                listbox._scrollStarted = setInterval(function () {
                    var body = listbox.$n('body'),
                        oldValue = body.scrollTop;
                    body.scrollTop += dir == 'down'? 20 : (-20);
                    // can not scroll any more
                    if (body.scrollTop == oldValue)
                        clearScroll(listbox);
                }, 50);
        }
        // clear scroll timer
        function clearScroll(listbox) {
            if (listbox._scrollStarted) {
                clearInterval(listbox._scrollStarted);
                listbox._scrollStarted = null;
            }
        }
    ]]></script>
    <div height="15px" />
    <listbox model="${model}" height="120px" width="200px" droppable="true">
        <listitem draggable="true" droppable="true">
            <listcell label="Item 1" />
        </listitem>
        <listitem draggable="true" droppable="true">
            <listcell label="Item 2" />
        </listitem>
        <listitem draggable="true" droppable="true">
            <listcell label="Item 3" />
        </listitem>
        <listitem draggable="true" droppable="true">
            <listcell label="Item 4" />
        </listitem>
        <listitem draggable="true" droppable="true">
            <listcell label="Item 5" />
        </listitem>
        <listitem draggable="true" droppable="true">
            <listcell label="Item 6" />
        </listitem>
        <listitem draggable="true" droppable="true">
            <listcell label="Item 7" />
        </listitem>
        <listitem draggable="true" droppable="true">
            <listcell label="Item 8" />
        </listitem>
        <listitem draggable="true" droppable="true">
            <listcell label="Item 9" />
        </listitem>
        <listitem draggable="true" droppable="true">
            <listcell label="Item 10" />
        </listitem>
        <listitem draggable="true" droppable="true">
            <listcell label="Item 11" />
        </listitem>
        <listitem draggable="true" droppable="true">
            <listcell label="Item 12" />
        </listitem>
        <listitem draggable="true" droppable="true">
            <listcell label="Item 13" />
        </listitem>
        <listitem draggable="true" droppable="true">
            <listcell label="Item 14" />
        </listitem>
        <listitem draggable="true" droppable="true">
            <listcell label="Item 15" />
        </listitem>
    </listbox>
</zk>


Download
The full resource with a demo flash can be downloaded from github

listbox_autoscroll_while_dragging.zul
and
listbox_autoscroll_while_dragging_se.zul
under WebContent at
https://github.com/benbai123/ZK_Practice/tree/master/Components/projects/Components_Practice/


listbox_autoscroll_while_dragging.swf is at
https://github.com/benbai123/ZK_Practice/tree/master/Components/demos

ZK Custom Component - Fancy Checkbox

As discussed here, we can make a fancy checkbox withing pure HTML,
in this post, we will talk about how to make ZK Checkbox component fancy.

Below is a normal ZK Checkbox:

<zk>
 <checkbox label="normal checkbox" />
</zk>


It works well and looks... normal, sometimes we want make it fancy.


View Demo Online

http://screencast.com/t/7YQyHc1X

How to style it? There are several steps, described as follows:

Step 1: Throw out the normal checkbox.

ZK already separate the checkbox and label as follows:


We want replace the checkbox element with a fancy one, we have to throw it out at first. We can not just drop it because already a bunch of function depends on it.

We do it by using zk.afterLoad client side API to override the bind_ method of ZK Checkbox.
The checkbox after this step becomes:

<zk>
    <script type="text/javascript"><![CDATA[
        zk.afterLoad("zul.wgt", function () {
            // store the old bind_ method
            var oldBind_ = zul.wgt.Checkbox.prototype.bind_;
            zul.wgt.Checkbox.prototype.bind_ = function (desktop) {
                // do the old bind_ method first
                oldBind_.apply(this, arguments);
                // get the checkbox element,
                // the $n(surfix) get the element which
                // id is 'Component_id' + '-surfix'
                var checkbox = this.$n('real');
                if (checkbox) {
                    // throw it out
                    checkbox.style.position = 'absolute';
                    checkbox.style.left = '-9000px';
                }
            };
        });
    ]]></script>
    <checkbox label="normal checkbox" />
</zk>


The box is out of the screen, we can only see the label.


Step 2: Add the fancy element before the label.

The next step is add a fancy element as the box of the fancy checkbox.

The checkbox after this step becomes:

<zk>
    <script type="text/javascript"><![CDATA[
        zk.afterLoad("zul.wgt", function () {
            // store the old bind_ method
            var oldBind_ = zul.wgt.Checkbox.prototype.bind_;
            zul.wgt.Checkbox.prototype.bind_ = function (desktop) {
                // do the old bind_ method first
                oldBind_.apply(this, arguments);
                // get the checkbox element,
                // the $n(surfix) get the element which
                // id is 'Component_id' + '-surfix'
                var checkbox = this.$n('real');
                if (checkbox) {
                    // throw it out
                    checkbox.style.position = 'absolute';
                    checkbox.style.left = '-9000px';

                    var cls = 'fancy_default';
                    if (zk.ie < 8)
                        cls += ' fixinline';
                    // add fancy element after checkbox element
                    jq(checkbox).after('<div id="'
                            +this.uuid+'-fancy" class="'
                            +cls+'"></div>');
                }
            };
        });
    ]]></script>
    <style>
        .fixinline {
            display: inline;
        }
        .fancy_default {
            display: inline-block;
            height: 15px;
            width: 15px;
            margin-right: 2px;
            background-repeat: no-repeat;
            background-image: url('img/fancy_default.png');
        }
        .fancy_over {
            background-image: url('img/fancy_over.png');
        }
        .fancy_down {
            background-image: url('img/fancy_down.png');
        }
        .fancy_checked {
            background-image: url('img/fancy_checked.png');
        }
        .fancy_disabled {
            background-color: #AAFFAA;
        }
    </style>
    <checkbox label="fancy checkbox" />
</zk>


only the fancy default displayed now.


Step 3: Add the event with respect to each status.

To make it active, the event control is required.

Add style with mouseover/mousedown event and remove it while mouseout/mouseup,

also sync the checked/disabled status from the normal checkbox.

<zk>
    <script type="text/javascript"><![CDATA[
        zk.afterLoad("zul.wgt", function () {
            // store the old bind_ and setDisabled method
            var oldBind_ = zul.wgt.Checkbox.prototype.bind_;
            var oldSetDisabled = zul.wgt.Checkbox.prototype.setDisabled;
            zul.wgt.Checkbox.prototype.bind_ = function (desktop) {
                // do the old bind_ method first
                oldBind_.apply(this, arguments);
                // get the checkbox element,
                // the $n(surfix) get the element which
                // id is 'Component_id' + '-surfix'
                var checkbox = this.$n('real');
                if (checkbox) {
                    // throw it out
                    checkbox.style.position = 'absolute';
                    checkbox.style.left = '-9000px';

                    var cls = 'fancy_default';
                    if (zk.ie < 8)
                        cls += ' fixinline';
                    // add fancy element after checkbox element
                    jq(checkbox).after('<div id="'
                            +this.uuid+'-fancy" class="'
                            +cls+'"></div>');
                    var fancy = this.$n('fancy');
                    if (fancy) {
                        var $fancy = jq(fancy),
                            label = fancy.nextSibling,
                            $label = jq(label);
                        if (checkbox.checked)
                            jq(fancy).addClass('fancy_checked');
                        if (checkbox.disabled)
                            jq(fancy).addClass('fancy_disabled');
                        // change style and
                        // trigger event on original checkbox
                        // with respect to fancy checkbox's event
                        $fancy.mouseover(function () {
                            jq(checkbox).mouseover();
                            if (!$fancy.hasClass('fancy_disabled'))
                                $fancy.addClass('fancy_over');
                        });
                        $fancy.mouseout(function () {
                            jq(checkbox).mouseout();
                            $fancy.removeClass('fancy_over');
                            $fancy.removeClass('fancy_down');
                        });
                        $fancy.mousedown(function () {
                            jq(checkbox).mousedown();
                            if (!$fancy.hasClass('fancy_disabled'))
                                $fancy.addClass('fancy_down');
                        });
                        $fancy.mouseup(function () {
                            jq(checkbox).mouseup();
                            $fancy.removeClass('fancy_down');
                        });
                        $fancy.click(function(){
                            if (!$fancy.hasClass('fancy_disabled')) {                                
                                jq(checkbox).click();
                                if (checkbox.checked)
                                    $fancy.addClass('fancy_checked');
                                else
                                    $fancy.removeClass('fancy_checked');
                            }
                        });
                        // change fancy checkbox's style
                        // with original label's event
                        $label.mouseover(function () {
                            if (!$fancy.hasClass('fancy_disabled'))
                                $fancy.addClass('fancy_over');
                        });
                        $label.mouseout(function () {
                            $fancy.removeClass('fancy_over');
                            $fancy.removeClass('fancy_down');
                        });
                        $label.mousedown(function () {
                            if (!$fancy.hasClass('fancy_disabled'))
                                $fancy.addClass('fancy_down');
                        });
                        $label.mouseup(function () {
                            $fancy.removeClass('fancy_down');
                        });
                        $label.click(function () {
                            // change style after original click
                            setTimeout(function () {
                                if (checkbox.checked)
                                    $fancy.addClass('fancy_checked');
                                else
                                    $fancy.removeClass('fancy_checked');
                            }, 0);
                        });
                    }
                }
            };
            // sync disable status after it set by API
            zul.wgt.Checkbox.prototype.setDisabled = function (v) {
                var checkbox,
                    fancy;
                oldSetDisabled.apply(this, arguments);
                if ((checkbox = this.$n('real'))
                    && (fancy = this.$n('fancy')))
                    if (checkbox.disabled)
                        jq(fancy).addClass('fancy_disabled');
                    else
                        jq(fancy).removeClass('fancy_disabled');
            };
        });
    ]]></script>
    <style>
        .fixinline {
            display: inline;
        }
        .fancy_default {
            display: inline-block;
            height: 15px;
            width: 15px;
            margin-right: 2px;
            background-repeat: no-repeat;
            background-image: url('img/fancy_default.png');
        }
        .fancy_over {
            background-image: url('img/fancy_over.png');
        }
        .fancy_down {
            background-image: url('img/fancy_down.png');
        }
        .fancy_checked {
            background-image: url('img/fancy_checked.png');
        }
        .fancy_disabled {
            background-color: #AAFFAA;
        }
    </style>
    <checkbox label="fancy checkbox" disabled="true" checked="true" />
</zk>


the image above is a fancy checkbox with initial checked and disabled.

Step 4: Create a test case.

After the fancy checkbox is done, we should create a use case and test it.

the test case:

<zscript>
    public void updateResult(Label result) {
        String s = "You chose: ";
        
        Page page = result.getPage();
        Checkbox cbx = (Checkbox)page.getFellow("bread");
        if (cbx.isChecked())
            s += "bread, ";
        cbx = (Checkbox)page.getFellow("ham");
        if (cbx.isChecked())
            s += "ham, ";
        cbx = (Checkbox)page.getFellow("beef");
        if (cbx.isChecked())
            s += "beef, ";
        result.setValue(s);    
    }
</zscript>
<div height="15px" />
<checkbox label="food group">
    <attribute name="onClick">
        bread.setDisabled(!self.isChecked());
        ham.setDisabled(!self.isChecked());
        beef.setDisabled(!self.isChecked());
    </attribute>
</checkbox>
<hbox>
    <div width="10px" />
    <vbox>
        <checkbox id="bread"
            label="bread" disabled="true"
            onClick="updateResult(result);" /> 
        <checkbox id="ham"
            label="ham" checked="true" disabled="true"
            onClick="updateResult(result);" />
        <checkbox id="beef"
            label="beef" disabled="true"
            onClick="updateResult(result);" />
    </vbox>
</hbox>
<label id="result" value="You chose: ham," />


Download
The full resource with a demo flash can be downloaded from github

The project:
fancy_checkbox.zul is under WebContent at
https://github.com/benbai123/ZK_Practice/tree/master/Components/projects/Components_Practice/


Demo:
ZK_fancy_checkbox_demo.swf is at
https://github.com/benbai123/ZK_Practice/tree/master/Components/demos

Sunday, January 8, 2012

Frequently used Javascript function

Frequently used function fragment, include:
check whether a dom element has a css class
insert dom element before another dom element
remove child dom element
get vertical scrollbar width of a div
trim left and right space of a string
replace all '.'
substring
get event in a function
get target from event
get elements by class name
Remove element from array by index

check whether a dom element has a css class

domElement.className.match(new RegExp('(\\s|^)'+the_class_name+'(\\s|$)'));

insert dom element before another dom element

anotherDom.parentNode.insertBefore(newDom, anotherDom);


remove child dom element

parent.removeChild(child)


get vertical scrollbar width of a div
div.offsetWidth - div.clientWidth;


trim left and right space of a string


string.replace(/^\s\s*/, '').replace(/\s\s*$/, '');

replace all '.'

string.replace(/\./g,'').replace(/,/g,'');

substring

// include start and exclude end
// e.g., '12345'.substring(2, 4)
//        result is 34
string.substring(start, end);


get event in a function


element.onmouseover = function (event) {
 if (!event) // IE will not pass event
  event = window.event;
}

get target from event


// srcElement is for IE
var target = (event.currentTarget) ? event.currentTarget : event.srcElement;

get elements by class name


// get elements by class name with respect to specific element
function getElementsByClassName (clsnm, parent) {
 var result = [];
 if (!parent)
  parent = document;
 // IE do not have getElementsByClassName
 if (parent.getElementsByClassName)
  result = parent.getElementsByClassName(clsnm);
 else {
  var tmp = parent.getElementsByTagName('*');
  for (var i = tmp.length-1; i >= 0; i--)
   if (tmp[i].className && tmp[i].className.match(new RegExp('(\\s|^)'+clsnm+'(\\s|$)')))
    result.push(tmp[i]);
 }
 return result;
}

Remove element from array by index

// splice (startIndex, length)
// remove 'length' elements from startIndex
// length = 1 -> remove one element
theArray.splice(idx, 1);


References
http://snipplr.com/view/3561/addclass-removeclass-hasclass/
http://blog.stevenlevithan.com/archives/faster-trim-javascript
http://stackoverflow.com/questions/960419/javascript-ie-event
http://stackoverflow.com/questions/857439/internet-explorer-and-javascript-event-currenttarget